

Posted on 5 August 2020, updated on 21 December 2023.
How does external DNS work?
In short, external DNS is a pod running in your EKS cluster which watches over all your ingresses. When it detects an ingress with a host specified, it automatically picks up the hostname as well as the endpoint and creates a record for that resource in Route53. If the host is changed or deleted, external DNS will reflect the change immediately in Route53.
How to set up external DNS in your Cluster
The setup can be divided into two parts, setting up permissions (to give your service access to Route53) and deploying the external DNS.
Setting up Route53 permissions for your external DNS
In this tutorial we will make use of an IAM role with an ID provider, this approach has been used and documented in other tutorials such as the one on AWS application load balancers.
The main idea here is to give the external DNS pod the permission to create, update and delete Route53 records in your AWS account. To do so, we need to use an identity provider in AWS IAM service. An identity provider allows an external user to assume roles in your AWS account by setting up a trust relationship.
Setting up the identity provider
To create an identity provider you need 3 things: a type of identity provider, an audience, and a provider URL. In this tutorial, we will use OpenId Connect for the provider type and sts.amazonaws.com for the audience.
The provider url varies, to get your provider url you can use the following command:
aws eks describe-cluster --name <CLUSTER_NAME> --query “cluster.identity.oidc.issuer” --output text
The output should look something like this:
https://oidc.eks.<region>.amazonaws.com/id/EXAMPLE86F27C29EF05B482628D9790EA7066.
You now have everything you need to set up your own identity provider!
Head over to the identity provider section of IAM in the AWS console and create a new provider.

Now that you have an identity provider, all that’s left to do is creating an IAM role with Route53 permissions and a trust relationship with your brand new provider.
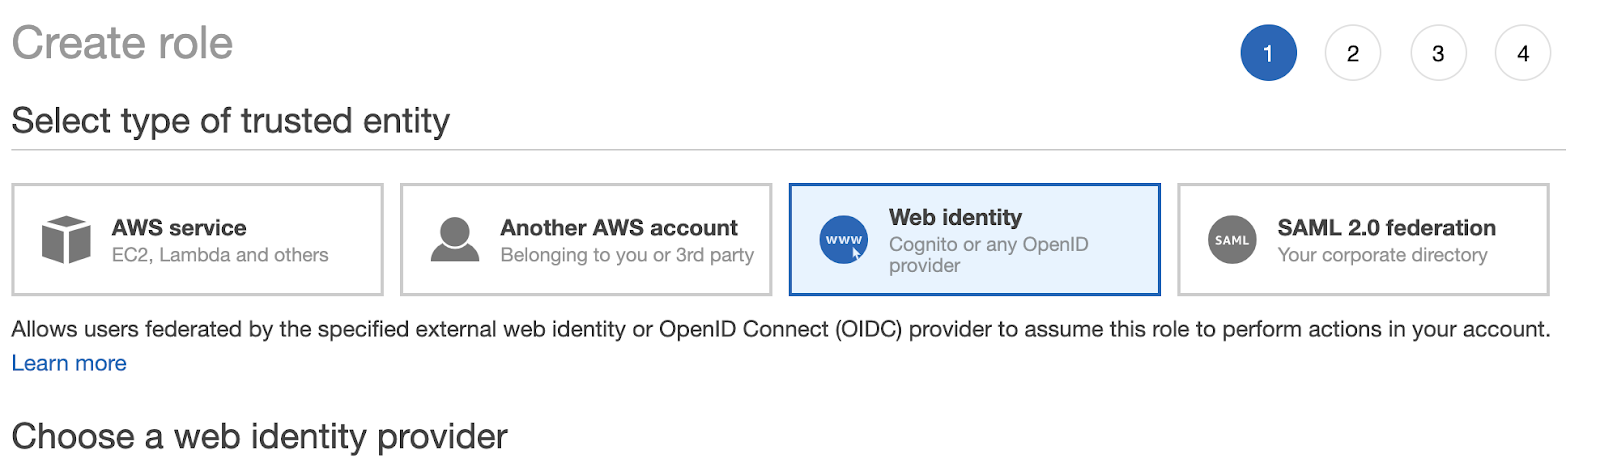
First, create a new role in IAM and trust your provider by selecting Web Identity and inputting your provider information.
Once this has been completed, click create a new policy and input the following in JSON:
Then attach the AmazonEKSClusterPolicy to the role as well.
Once the role is created, keep the ARN, you will need it later.
Installing the external DNS
We will install the external DNS using helm, if you do not have helm installed on the machine you can find instructions to install helm.
Once you have helm installed, connect to your cluster and run the following command:
RELEASE_NAME - name of the helm release, can be anything you want (external-dns for example)
DOMAIN_FILTER - name of your Route53 hosted zone if *.example.com would be example.com. You can find information about domain filter in the AWS console (Route53)
HOSTED_ZONE_ID - id of your hosted zone in AWS. You can find this information in the AWS console (Route53)
ROLE_ARN - ARN of the role you created earlier in the tutorial
Once you’ve run the command you can check that your newly created service is running in your cluster:
kubectl get po -n kube-system (you should see an external DNS pod)
Using the external DNS
To create a new Route53 record for your services all you need to do is add the annotation: external-dns.alpha.kubernetes.io/hostname
Example of a LoadBalancer service:
NodePort service:
For an ingress:
Debugging the external DNS
If the Route53 records haven’t been created after 5 minutes you might want to check the logs of your external DNS pod. To do so run the following:
k logs -n kube-system <EXTERNAL_DNS_POD_NAME>
To conclude, using an external DNS in your amazon EKS cluster will make your life much easier when it comes to managing Route53 records and, as described above, is very easy to set up yourself.