

Posted on 27 May 2020, updated on 15 November 2022.
Step 1: Make sure your Windows 10 version is 2004 or later
- Select the Start button > Settings > System > About
- Under Windows Specifications, you will see which version of Windows 10 you’re running
- If your version is lower than 2004, go to Windows Update in your settings and update Windows
- If the v2004 update doesn't show up, you can use the Update Assistant to update Windows 10
Step 2: Getting your machine ready to use WSL 2
- Search for ‘’Turn Windows features on or off’ in your search bar on the bottom left of your screen
- Enable both ‘Virtual Machine Platform’ and ‘Windows Subsystem for Linux’
- Restart your computer
Step 3: Installing a Linux distribution on Windows 10
- You can install a Linux distribution from the Microsoft store, in this tutorial we will be using ‘Ubuntu 18.04 LTS’
![Ubuntu1804]()
- Once the Linux distribution has been installed, start it up
- You will be asked to create a username and password when you launch Linux for the first time, these have no bearing on your windows system so choose whatever you want!
![CommandLine]()
- You can now close the application


Step 4: Using WSL2 to run your Linux distribution
- Make sure you have the latest version of WSL 2 installed by running the update package found here;
- Open WindowsPowerShell
- Run
wsl -lto list the Ubuntu distributions you currently have installed, you should see ‘Ubuntu-18.04’ in the list - Set the WSL version for Ubuntu 18.04 by running
wsl --set-version Ubuntu-18.04 2(The 2 at the end is very important because it tells your machine you want to use WSL2) - You can check that you successfully switch to wsl 2 by running
wsl -l -v![WSL2]()

Additionally, if you want to make WSL 2 your default architecture you can do so with this command:
wsl --set-default-version 2
Step 5: Installing Docker on Windows 10
- Download the latest release of Docker Desktop
- Follow the usual installation instructions to install Docker Desktop
- Start Docker Desktop from the Windows Start menu
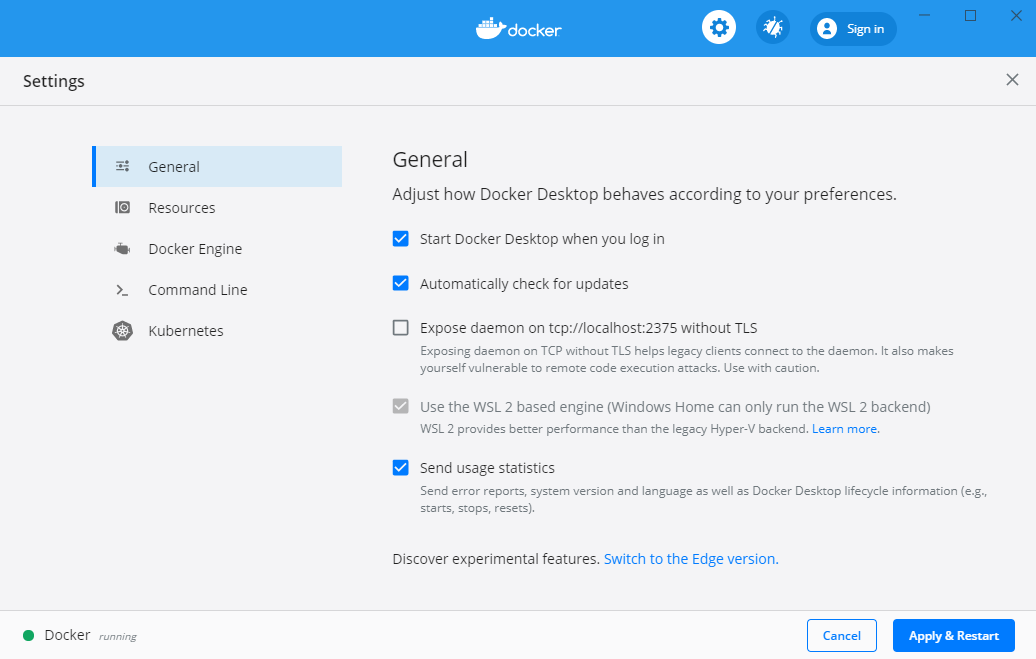
- From the Docker menu, select Settings > General
- Make sure that ‘Use the WSL 2 base engine’ is selected. If it wasn’t, select it and click Apply & Restart
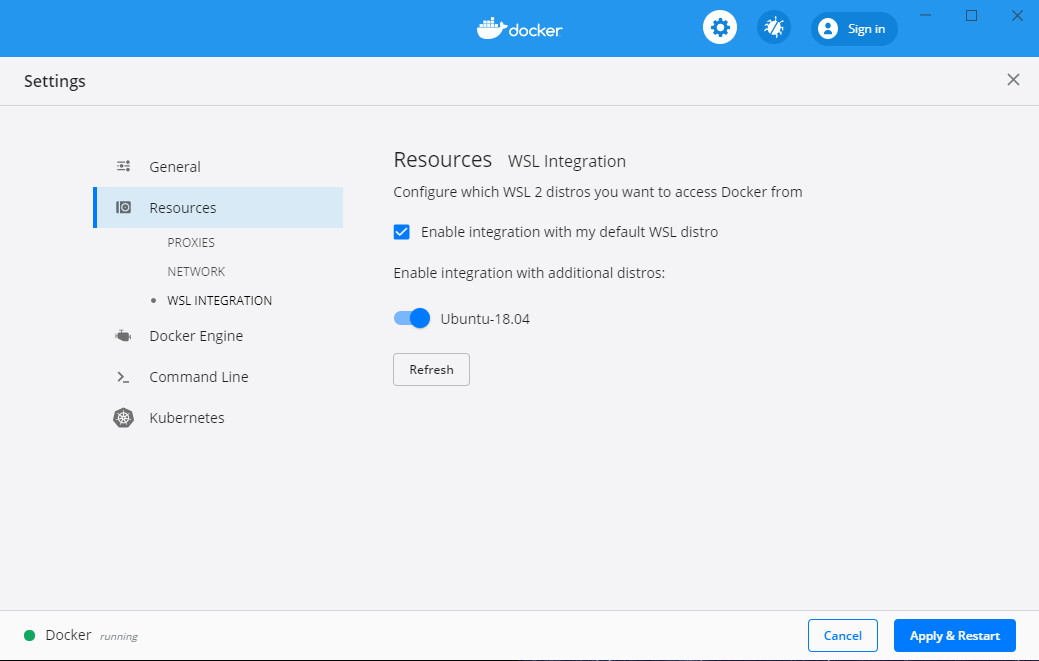
- Now go to go to Settings > Resources > WSL Integration in Docker and select your Linux distribution (Ubuntu 18.04 in this tutorial)
![updated_screenshot_docker2]()
- Enable the Docker integration with the kernel you installed (Ubuntu 18.04) and click Apply and restart
![updated_screenshot_docker1]()
Step 6: Using Docker in Windows 10
- To use Docker in your distribution, Docker Desktop has to be running
- Launch your distribution (Ubuntu 18.04 LTS in this tutorial)
- Run ‘docker version’ to check that Docker is running and accessible
You’re all set! If you want to familiarize yourself with Docker this tutorial will help you understand and use all the basic commands in Docker.
Quick tip
The Docker team recommends that you avoid mounting from the Windows 10 file system (even on a WSL distro). For example, avoid docker run -v /mnt/c/users:/users and use docker run -v ~/my-project:/sources <my-image> instead.
This is very important because WSL 2 is fast when working within the Linux filesystem but it gets much slower when working with files located in your Windows filesystem.