

Posted on 17 August 2020, updated on 19 December 2023.
In this article, we are going to set up a NFS dynamic persistent provisioning with a ReadWriteMany access:
- Mount: enable the container to access an external storage
- Persistent: this external storage is still accessible after container shutdown
- Dynamic: the external storage’s creation and life cycle are not managed by the user
- NFS: The external storage will be exposed via the Network File System protocol
- ReadWriteMany: Multiple containers can simultaneously access the storage in write mode
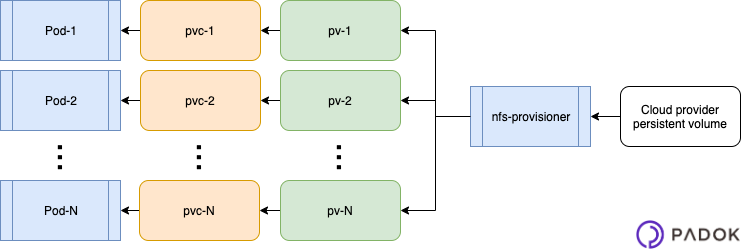
The following diagram sums up the Kubernetes resources we are going to deploy:
Dynamic external storage attribution
To realise a NFS dynamic external storage attribution (PersistentVolume or PV), we need an NFS storage controller (also known as “provisioner”).
A provisioner can receive storage requests (PersistentVolumeClaim, or PVC) through a storage class (StorageClass). It will answer them by creating a PV and binding it to the PVC.
In terms of Kubernetes resources, the workflow obtained will be the following:
- A PVC references a StorageClass
- The StorageClass is handled by a controller
- The controller provisions a PV and binds it to the PVC
Note: Depending on the Kubernetes infrastructure deployed, an NFS provisioner might be integrated natively. If not, it is necessary to install one manually.
NFS provisioner deployment on Kubernetes
The easiest way to proceed is to use a Helm chart. This method requires:
- Helm available in your Kubernetes cluster (which installation will not be addressed here)
- access to an Internet connection
We must first create a values.yaml file. The following example should be enough in most cases:
This configuration example specifies the StorageClass name that will be used to reference it from the PVCs, and activates persistency with a size of 1Gb.
You can then install the provisioner as follows:
$ helm install stable/nfs-server-provisioner --name nfs-provisioner -f values.yaml
This command installs a new NFS provisioner in your Kubernetes cluster, named “nfs-provisioner”, from the values.yaml configuration file.
Warning: like the pods, the provisioner itself needs persistent storage.
Indeed, we are deploying the provisioner in our cluster. It will, therefore, be deployed as Deployment, ReplicaSet and Pod like every Kubernetes deployment, and will not have persistent storage by default.
Actually, the Helm chart enables by default the use of an external persistent storage, like EmptyDir. But EmptyDir is persistent only for the lifetime of the current pod. This means, that if the pod is destroyed and rebuilt on another node, all the provisioner’s data will be lost.
And what would happen to the applications whose volumes are managed by the provisioner? We will come back to this later, but they would not be able to access their storage any more, and we definitely don’t want that.
For now, the important thing is that we ALWAYS want to set persistency for the NFS provisioner beyond pod termination, via the definition of the 3 following parameters:
- enabled: true
- storageclass: here, specify the name of the StorageClass the provisioner will use as a backend
- size: the relevant size for your project
You can then execute the Helm command mentioned earlier.
How the provisioner operates
The provisioner mounts its external volume on /export/ and creates inside an arborescence following this pattern:
Here, the “pvc-*” directory matches a PV, exported in NFS and bound to a PVC. This provisioner has only one, but could obviously have more.
The “nfs-provisioner.identity” file contains a unique identifier that is associated with the PV Kubernetes object as an annotation. This identifier enables the provisioner to know which PV it owns, and which it should not interact with.
This enables the provisioner to manage the lifecycle of its PVs, and leave the other provisioners’ PVs be.
Last but not least, when the provisioner stops - whatever the reason -, it does not modify the objects it has created. Even if it reboots on a different node, it will be able to resume managing its PVs, and our applications that need these PVs will work as if nothing happened.
Non persistent provisioner storage
As previously outlined, external provisioner storage must persist beyond pod lifespan.
To understand why it is so important, let’s assume it is not the case, and that the provisioner stores its data via a EmptyDir volume. If the provisioner is destroyed and started back up on another node, it will then start up as “blank”, but the PV objects will not have disappeared.
For the PV did not disappear, the associated PVC are still up and our applications will try to use them, which will simply fail.
Indeed, these PVs are now pointing to our new provisioner instance (named exactly like the former instance from Kubernetes’ point of view), which has lost its storage, and in consequence all its “memory” of the PVs.
So, on one hand, the directory the applications are trying to mount does not exist any more, which will prevent the creation of associated pods. And, on the other hand, the provisioner has changed identifiers (because it is randomly generated), and will not recognize the current PV, which will not be destroyed.
It is to avoid this kind of scenario that the provisioner must have persistent storage.
If it happens, what then?
If you find yourself in the situation mentioned above, the easiest way to fix the problem is to “delete” and “create” the PVC to force the allocation of a new PV, which will be recognized by the provider.
Except that, for security reasons, Kubernetes prevents deleting a PVC if it is used by a pod … So you will have to proceed as follows:
- Update the applications using this PVC, so they stop using it (for instance switching them temporarily to a EmptyDir-type volume).
- Destroy the PVC
- Destroy the PV: No choice here, since the provisioner managing it has disappeared, and the corresponding storage as well …
- Re-create the PVC with the same name
- A PV will automatically be attributed to the PVC by the provisioner.
- Rollback the application so it can resume using the PVC and so benefits from a long-duration, persistent volume.
As you can see, it is a situation we would rather avoid :-)
Using the provisioner
After all these explanations, we are eager to use our new storage provisioner to deploy the Kubernetes resources that will use it.
This part is easy, for with the Helm chart deployment a StorageClass has been automatically created under the name “nfs” (of course, you can change this name).
You just need to create a .yaml file for the PVC, like:
Then, you need to generate the associated Kubernetes object:
$ kubectl create -f nfs_claim.yaml
And then use it in the definition of a Kubernetes object encompassing a pod definition, for instance:
And then again generate the Kubernetes object:
$ kubectl create -f mon_objet_kube.yaml
You can now verify with a “kubectl describe” that your object has been allocated a persistent NFS volume, accessible with write access from containers belonging to multiple pods.
You now have an NFS storage provisioner in your Kubernetes cluster. It enables you to easily generate NFS persistent volumes accessible with write access from containers belonging to multiple pods.
This provisioner is also configured to use a persistent storage external to the cluster itself, so that you don't lose data if your pod is destroyed, for example when updating Kubernetes.