

Posted on 9 December 2020, updated on 21 December 2023.
This “How To” is not recommended for beginners, therefore, I assume that:
- You are familiar with Docker
- You know how to setup and use Terraform
- You already have / created a GitHub repository (empty one or with your NodeJS app)
Here is what we’re going to set up:
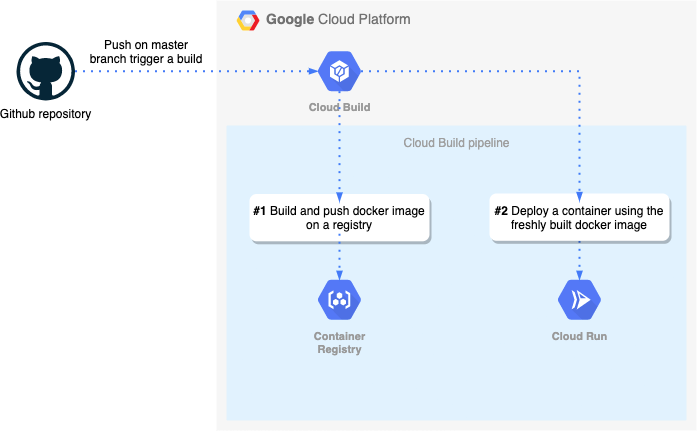
Let’s get started!
Firstly let's talk a little bit more about Cloud Build. As I already told you, Cloud Build is (a very cool) serverless CI/CD platform.
Cloud Build will allow us to create complete workflows to quickly build our code, containerize it (or package source to a non-container artifacts) and deploy it to a VM, k8s or serverless for instance.
It basically works with something called "Triggers" which contains the configuration on how Cloud Build will be triggered. We could say that our triggers represent pipelines.
For instance, in a trigger's configuration you'll have the following things:
- Name
- Description
- Event (repository event that invokes trigger):
- Push to a branch
- Push a new tag
- Pull request (works with Github App only)
- Sources:
- Repository that you already linked
- Branch pattern (regex)
- Build configuration:
- File type (Cloud Build configuration file or a Dockerfile)
- Cloud Build configuration file location / Dockerfile informations
- Advanced:
- Substitution variables
Now, stop talking and let's build 😎
Application source code
For this How To, I'll deploy a simple "hello world" NodeJS app. At the moment, I have the following files in my repository:
Setup our GitHub repository in Cloud Build
Well, the first thing to do is to link our Github repository in Cloud Build in order to trigger any event from it. To do this:
- From the Cloud Build console, go to Triggers and then click on manage repositories
- Click on connect repository
- Select your source, in our case GitHub and then click Continue
- Under GitHub Account, click on Add new account
- It will pop up a new window that will ask you to connect your GitHub account and select an account or an organisation
- Once your account is selected, choose to whether connect to all repositories or only one
- Then click Install
- You should get another pop up window that will ask you to configure a few GCP stuffs like GCP project, GitHub repository etc. Important thing, when you'll be at the Trigger settings step, just click on Skip for now! We'll create trigger using terraform later 😉
- Finally, click Done, you can then close pop up window and we're done with the GitHub repository configuration ✔️
Create an artifact registry repository using terraform
We are going to create a GCP artifact registry repository in order to store our app 's docker images. To do so:
In case you got an error like Error: Error creating Repository: googleapi: Error 403: Artifact Registry API has not been used in project XXXXXXXXXXX before or it is disabled while creating resources with terraform , it means that you need to enable the Artifact Registry API in order to create your repository.
So, either you can enable the API by going to the GCP console, or you can do it using terraform, like this:
Create our first Cloud Build trigger using terraform
Our first trigger will be pretty simple:
It will be executed when a push event to master branch occurs and will do everything described in the cloudbuild.yaml from our GitHub repository. We will also create this file immediately!
You can put the following file at the repository' root:
We can see two fields here:
- name: cloud builder's name. A cloud builder is a container image running common tools. You use a builder in a build step to execute your tasks
- args: list of arguments to pass to the builder (referenced by the name field). If the builder has an entrypoint, args will be used as arguments to that entrypoint otherwise the first element in args will be used as the entrypoint, and the remainder will be used as arguments.
At the moment, the step introduced in our freshly created cloudbuild.yaml file will just display a pretty "hello world" in the build's logs on the GCP console.We'll update this file later on the Cloud Run section 😉
Well, now we have our GitHub repository linked to Cloud Build, an artifact registry repository ready to welcome our app's docker images, a Cloud Build trigger, and finally a cloudbuild.yaml file, we are able to test our pipeline 🚀
Test the pipeline
We will now make sure that our pipeline is working. To do this, we simply need to commit & push on the master branch of our GitHub repository. In my case, I just committed and pushed the newly created cloudbuild.yaml file.
Once you pushed something on your GitHub repository, from the History section of the Cloud Build console, you should see something like this:
-1.png)
Now, if you click on the build's ID link, you should see our "hello world" message:

We successfully ensured that our pipeline is working correctly.Now, all we have to do is to build and deploy our NodeJS backend running on Cloud Run! 🤓
Cloud Run
Cloud Run is a fully managed serverless platform that allows you to run stateless containers reachable via web requests (or Pub/Sub events). Cloud Run abstract the entire infrastructure so it let you focus on your app development.
In the previous sections, we saw how to use Cloud Build to deploy a simple pipeline that displays an "hello world" message in the build's logs.
Now, what we want is to build and deploy our NodeJS backend on Cloud Run using Cloud Build.
As you may already understand, we'll have edit the cloudbuild.yaml file in order to create following pipeline's steps:
- Build the container image
- Push the container image to the artifact registry repository
- Deploy the container image to Cloud Run
Let's do this!
Step 1: Build the container image
In order to build a docker image, we first need to create a Dockerfile in our GitHub repository that will be used by the docker build command:
I'll not explain Dockerfile file each lines since it is really easy to understand 🙂
Well, now, we have to edit the cloudbuild.yaml file in order to add the docker image build step:
Woaaww wait! What are these variables?! 😱
We can see two kind of variables here:
- ${_REGISTRY_URL} & ${_REGISTRY} are personal substitution variables for builds invoked by the trigger that we've created with Terraform
- $PROJECT_ID & $SHORT_SHA are part of default substitution variables for builds invoked by triggers
Therefore, we need to update our trigger adding these substitution variables. To do this, will have to edit the trigger.tf file:
My _REGISTRY variable refers to the artifact registry repository terraform resource and for the _REGISTRY_URL variable, you can check the repository URL from the Artifact Regsitry console.
If you want more information about Cloud Build's substitution variables, you can check the official documentation.
Once your freshly updated terraform manifest applied, if you go to the Triggers section of the Cloud Build console and click on the trigger that we've just updated, you should see your substitution variables:

Step 2: Push the container image to the artifact registry repository
Ok, we know how to build our application docker image, but now if we want to run our application using Cloud Run, we'll need to push it to our artifact registry repository. To do so, add the following step to your cloudbuild.yaml file:
We'll wait until the end of step 3 before pushing the cloudbuild.yaml file.
Step 3: Deploy the container image to Cloud Run
We're almost done! Let's add the last step to our cloudbuild.yaml file:
As you may see, we have to add a few substitution variables to our trigger! Let's add them:
Also, we'll need to ensure that the Cloud Run API is enabled, and that the Cloud Build service account (automatically created) has sufficient rights to use Cloud Run. To to this, let's edit the trigger.tf file consequently:
It's time to push! But be careful... Before pushing the final cloudbuild.yaml file to your GitHub repository, the trigger need to be updated so do not forget to apply your terraform manifest!
I feel like we're ready to run our application on Cloud Run!! 🤩🚀
Check that our application is working
I assume that you already pushed the final version of the cloudbuild.yaml file.
The very first thing to check after pushing everything is the build status. If the build successful, you should see this from the History section of the Cloud Build console:

Well, it's a good start! Let's take a look at the Cloud Run console now:

It seems like our application is running but to be sure, we still need to check that the backend is working correctly.
To retrieve the app's URL, just click on the app name from the Cloud Run console:

Now you can use the curl command, an application like Postman or simply use your browser to check that everything is working fine. You should see a pretty "Hello World!":
> curl https://helloworld-oqdeheujtq-ue.a.run.app
Hello World!%
That's it! We just built and deployed a NodeJS backend on Cloud Run using Cloud Build.
Our application is 100% managed by GCP and it is publicly accessible since we used following flags:
- --platform set to managed which means that we want to use the fully managed version of Cloud Run. This flag can be set to gke or kubernetes.
- --allow-unauthenticated to make the app publicly available.
To go further
Domain Mapping
As you may see, the URL is automatically and randomly generated by GCP. Know that it is possible to use your own domain name thanks to Domain Mapping.
Custom resources
Fully managed does not mean that it is not possible to customize the settings of your application. Cloud Run use knative to manage your application and it allow you to customize some kubernetes related things like:
- --memory to set a memory limit
- --cpu to set a cpu limit
- --max-instances to set the maximum container to run
- --labels to set a list of labels on your app
To know more about what you can do, I invite you to use the gcloud run deploy --help command or read the official documentation.