

Posted on 3 August 2021, updated on 28 July 2023.
What is Kong?
Kong is an open-source Lua application using Nginx to have an API gateway in front of your APIs. Thanks to Kong plugins, you can customize the API gateway with many rules like rate-limiting, oauth2 … You can see all the possibilities in the Kong hub.
Imagine you have two APIs: API 1 and API 2, where the first one is a client of the second, and the API 2 has to be behind the kong API gateway. To do it, you have to create the following resources:
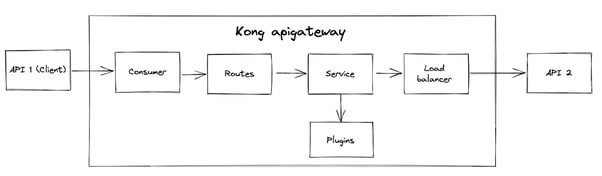
Consumer: The user-defined for the routes of API 2
Routes: The routes of API 2, which will be behind the API gateway
Service: Component which represents your API 2 inside the Kong API gateway
Load Balancer: The Kong load balancer
Plugins: Kong plugins to define rules for the API 2 routes
The consumer, routes, service, and plugins have to be created by yourself.
How to deploy a Kong API gateway in a Kubernetes cluster?
To have a functional API gateway, we are going to proceed in 3 steps:
- Deploy the Kong Ingress Controller
- Configure the Kong plugins and consumers
- Configure API gateway routes
Deploy the Kong Ingress Controller
A Kubernetes Kong deployment contains an ingress controller for managing network traffic. You have different possibilities to deploy it with YAML manifest directly or with the helm chart.
This article shows you how to deploy it with Helm. This chart deploys a Kong Ingress controller. It can manage network traffic inside the cluster.
At the end of this article, we will get the following architecture:
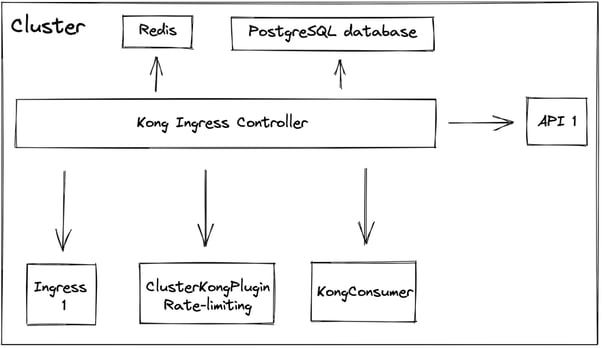
The hearth of this configuration is the Kong Ingress Controller. It aims to manage all API gateway routes.
To store its configuration, we are going to use a PostgreSQL database.
For information, you can deploy a Kong API gateway without a database. You have to manage the configuration in another way, like a configmap.
I prefer using a database because the DB-less mode requires more attention, especially for updating the configuration.
The Kong Ingress controller needs some static resources:
- KongPlugins and KongClusterPlugin
KongPlugins and KongClusterPlugin allow you to create Kong plugins inside the cluster. The only difference is their scope. KongPlugins takes action in its namespace, whereas KongClusterPlugins takes action everywhere.
In this article, we are going to implement a rate-limiting cluster plugin. The rate-limiting can be configured with a Redis, and it was my choice.
- KongConsumer
A KongConsumer is a static resource for defining the consumer that will use the routes defined behind the API gateway.
- Ingress
The ingress is used to define the API gateway routes for API 1. Kong lets you create an equivalent resource: KongIngress.
It gives more possibilities than the common ingress. For example, you can define an ingress rule for only responding to specific method requests like GET, POST…
In our case, we do not need a specific configuration for my routes, so I chose the resource Ingress.
Now, we are going to begin this implementation.
First, we need the Kong Helm chart repository:
helm repo add kong https://charts.konghq.comBefore installing the Kong ingress controller in your cluster, create your values.yaml file to configure the chart as you want. If you use the default values, you don’t need to implement the following values.yaml. To decide, you can check the default values directly in the Github repository.
env:
 pg_database: kong
 pg_hos: kong-ingress-controller-postgresql
 database: postgres
 pg_user: kong
 pg_password:
  valueFrom:
   secretKeyRef:
    key: postgresql-password
    name: kong-ingress-controller-postgresql
postgresql:
 enabled: true
 postgresqlUsername: kong
 postgresqlDatabase: kong
 service:
  port: 5432
 existingSecret: kong-ingress-controller-postgresql
In these values, I configure Kong with some environment variables thanks to the parameter env:
- pg_database: database name
- pg_host: database host
- database: database type
By default, the chart sets this variable to “off” because the PostgreSQL database is by default disabled.
- pg_user: Database user
- pg_password: Database password
Then, I add PostgreSQL configuration below the postgresql key:
- enabled: Enable the PostgreSQL database for kong
- postgresqlUsername: Database username
- postgresqlDatabase: Database name
- service.port: Database Kubernetes service port number
- existingSecret: Existing secret in which there is the database password
For information, I use an existing secret for database password, but the chart can create a password for your kong database. Thus, it is not necessary to specify the keys postgresql.existingSecret and env.pg_password.
Now install the chart:
helm install kong-ingress-controller kong/kong-ingress-controller -f values.yamlYou deployed the helm release kong-ingress-controller! You can now configure your kong API gateway with plugins and consumers.
Configure plugins and consumers
For my case, I chose just one plugin to show you how to create a Kong API gateway plugin: rate-limiting. So, you have two choices to create a plugin: KongClusterPlugin and KongPlugin. The second one is namespaced, the first one is available in all namespaces.
In my example, I will implement a KongPlugin, but it is the same configuration for a KongClusterPlugin resource. So, you can just change the type of the Kubernetes resource to transform a KongPlugin to a KongClusterPlugin.
To create the kongPlugin for rate-limiting, I use the following yaml file:
apiVersion: configuration.konghq.com/v1
kind: KongPlugin
metadata:
name: rate-limiting
plugin: rate-limiting
config:
policy: redis
redis_host: redis-instance
redis_port: 6379
second: 300- plugin: It is the plugin type
- config: The plugin configuration
- config.policy:
You have three possibilities for this parameter: local, cluster, and Redis.
Local means the counter will be stored in memory.
Cluster means the kong database will store the counter.
Redis means a Redis will store the counter.
config.redis_host: The Redis host.
- config.second: The maximum of requests per second
I chose the Redis policy because I already had a Redis in my cluster. If you want to deploy one Redis, for instance, you can use the official Redis helm chart.
Now, we have our rate-limiting plugin, but a consumer is missing!
Creating a Kong consumer for your API gateway is straightforward by default. You can use this configuration:
apiVersion: configuration.konghq.com/v1
kind: KongConsumer
metadata:
name: my-great-consumer
username: my-great-consumer
custom_id: my-great-consumer
And that’s it! Your consumer is ready to be used! However, I do not recommend using this configuration for production environments because it is not fully safe. In this configuration, we do not have authentication for our future routes.
You can use another plugin like oauth2 to configure authentication on your consumer.
At this time, we have a kong ingress controller, a rate-limiting plugin, and a consumer. Thus, our API gateway is almost ready. Next, you have to implement the routes.
Configure API gateway routes
To implement them, we have several choices:
- Use standard Kubernetes ingress
- Use KongIngress resources
My piece of advice is to use the first one when you want all requests for a specific URL route through the Kong API gateway.
If only POST requests have to be routed through the API gateway, choose the second one.
In my case, I just want to route all requests through Kong. Therefore I chose a standard Kubernetes Ingress resource.
To give details about my architecture, I need to have only two APIs routes behind the Kong API gateway: /users and /groups. To do it, I implemented the following ingress:
apiVersion:
kind:
metadata:
 name: api-gateway-routes
 annotations:
  konghq.com/plugins: rate-limiting
spec:
 ingressClassName: "kong"
 rules:
  - host: myproject.api.me
    http:
     paths:
      - path: /users
        backend:
         serviceName: myproject
         servicePort: 80
      - path: /groups
        backend:
         serviceName: myproject
         servicePort: 80
This ingress defines some important parameters:
- ingressClassName: The ingress class.
- annotations.konghq.com/plugins: The list of Kong plugins
- rules[].host: The API host
- rules[].host.http.paths[]: routes paths
- rules[].host.http.paths[].backend: The API service
If you have several plugins, separate them with a comma like:
konghq.com/plugins: rate-limiting,plugin2,plugin3Send this ingress to the Kubernetes API, and, well done, your Kong API gateway is ready!
Conclusion
I hope this article helped you to do what you want. Now, you know every basic step for deploying a Kong API gateway in a Kubernetes cluster. However, Kong gives you many possibilities with its plugins. You can add many rules with your API gateway-like security rules.
Therefore, go to the Kong plugins hub to discover all possibilities for your infrastructure.
I think Kong is very interesting when you want to put every route in an API gateway with many rules. But it can be overkill if you just want a simple API gateway because of the deployment complexity.