

Posted on 6 April 2023, updated on 21 December 2023.
Before we start
This article does not replace a real network course and for the sake of simplification, it may contain some inaccuracies.
For information, I am working on a Mac. Therefore, some commands that I use in this article may not work on Linux or Windows.
Launching the script
Let's consider the following client.py file:
import requests

response = requests.get(url="http://www.google.com/")
Let's run it:
python client.pyWhat happens when this command is executed?
First of all, if I was able to type my command in the terminal, it was because the terminal is being executed, and it launched a shell. This can be bash or, in my case, zsh.
We can see the processes running on the computer with the htop software for example. The "tree" view allows us to see the parent-child relationships between processes in the form of a tree.

Here we can see that the Terminal program created a login process, which in turn created a -zsh process. Finally, when I entered the command python client.py, -zsh launched the execution of python, passing the path of the client.py file as an argument.
The Python interpreter can now start reading the client.py file line by line.
Using the Python debugger, we notice that the script uses several libraries:
requestshttpurllib3socket
I will not go into detail about what each library does but rather focus directly on the lowest-level library: socket. This library provides a Python interface to C code that links to the Kernel.
Here is a script that allows you to make an HTTP request using only the socket library:
# client.py
import socket

socket = socket.socket(socket.AF_INET, socket.SOCK_STREAM)
socket.connect(("www.google.com", 80))

request = b'GET / HTTP/1.1\r\nHost: www.google.com\r\n\r\n'
socket.sendall(request)

response = b''
while True:
    data = socket.recv(4096)

    data_len = len(data)
    response += data

    if len(data) < 4096:
        break

print(response)
socket.close()
What the requests, http, and urllib3 libraries do should look like this script. However, they probably add features related to security, performance, reissuing requests, managing multiple requests, etc.
We can see that the first thing to do to make an HTTP request is to open a socket!
Opening of the socket
# client.py
import socket

socket = socket.socket(socket.AF_INET, socket.SOCK_STREAM)
socket.connect(("www.google.com", 80))
To understand this part, I need to explain two concepts: the socket and the TCP connection.
- A socket is an interface that the Kernel will give to a program to communicate with a remote computer.
- A TCP connection is a connection that two computers will use to communicate with each other. For a socket on the client computer, there is one TCP connection.
We can represent these two concepts as follows:
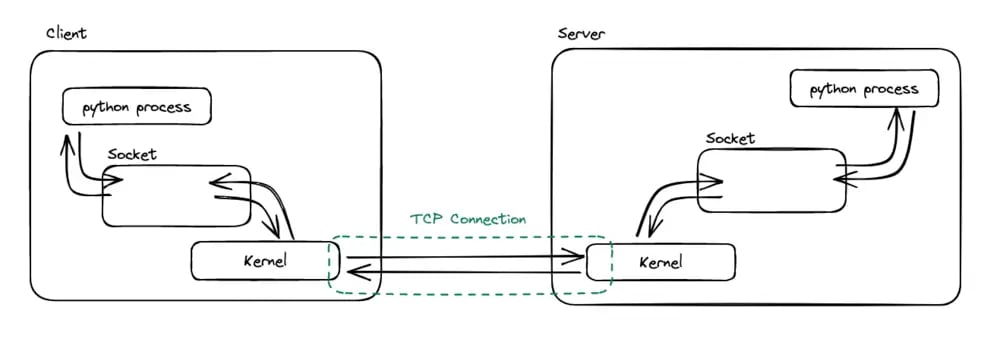
The Kernel opens a TCP connection with the remote computer and provides a socket for the Python process. The Kernel and the Python process can then read and write information to the socket.
Here is what the Kernel will do to open the TCP connection.
Determining the IP address and port of the server
Determining the IP address using a DNS request
To know which computer to send the HTTP request to, the Kernel must send a first request called a DNS request to determine the IP of the server.
The IP of a computer corresponds to the address of the computer on the network.
We give a domain name as a parameter of the DNS request, and the DNS servers respond with the associated IP address.
It is possible to reproduce a DNS request with nslookup, for example:
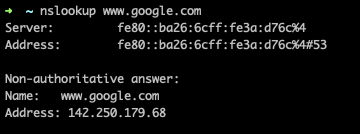
Here we can see that the IP address of www.google.com is 142.250.179.68.
Determining the port
Now that we have the address, we need the port on which the web server is listening!
This port is determined by convention: in the web, the default listening port is 80 (or 443 for HTTPS).
Determining the client's IP address and port
Our client knows how to send an HTTP request to the remote server. But the reverse is not true yet. For the connection to be complete, the server needs to know the client's IP address and port to which it will send its response.
Determining the IP address
The client Kernel is aware of its own IP address as soon as it connects to its network.
For the sake of simplicity, let's imagine that our computer is directly connected to the internet. We have the client's IP address.
In reality, our computers are often connected to private networks that are connected to the internet through a router. The router transmits the public IP address to use for sending a response and redirects the server's response to the right computer on its private network.
Determining the port
The client Kernel will randomly choose a port from the available ports it has.
The client will communicate the IP address and port to the server at the time of connection opening.
💡 Listing TCP connections on a computer :
The netstat command allows us to list TCP connections on our computer. If I run it at the same time as my script, we can see that a socket is opened:

Here we can see the necessary information for the connection: Google's IP address 142.250.179.68, and the port 80.
The port 50751 is randomly determined by my Kernel and the IP address of my computer (which I have hidden here) on my box's network.
Sending the HTTP Request
# client.py
import socket

socket = socket.socket(socket.AF_INET, socket.SOCK_STREAM)
socket.connect(("www.google.com", 80))

request = b'GET / HTTP/1.1\r\nHost: www.google.com\r\n\r\n'
socket.sendall(request)
HTTP format
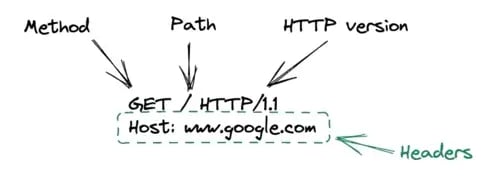
The first thing to do is to format a request in the HTTP format.
HTTP stands for Hypertext Transfer Protocol. Therefore, it is a text format protocol, and we can format our request with text!
Here is the format to follow:
Now that we have an HTTP-formatted request and a socket, our program can send the request. This is done at the socket.sendall(request) level in the script.
Now, the kernel will take over. And for our HTTP request to reach its destination correctly, we will need to add some information to it.
The request can be seen as a packet that will be sent over network cables. For the packet to reach its target, it needs an address to go to, among many other pieces of information.
The way these pieces of information should be added to the packet is governed by a set of protocols.
To better understand what this information is and which protocol is responsible for which information, the OSI model is useful.
OSI Model
The OSI model is composed of a set of 7 layers.
It goes from layer 1, which corresponds to physical hardware such as cables, network cards, physical ports, etc., to layer 7 where the HTTP protocol is located.
The different protocols involved in a web request are as follows:

We will ignore layers 1, 5, and 6 in this article. I did not investigate the physical layer and layers 5 and 6 are not necessarily required to carry out an HTTP request. One can very well imagine a request without cookies and without HTML in response.
Let's go back to our HTTP request.
First, we need to add information related to the TCP protocol to it. To do this, we will wrap our HTTP packet in a TCP packet.
TCP
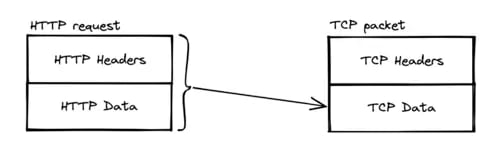
Just like an HTTP request has headers and content, a TCP packet also has headers and content. The content corresponds to the "data" field in the diagram.
In a TCP packet, the data field will contain the entire HTTP request.
The information related to TCP will therefore be found in the TCP headers. And in particular, the TCP headers contain the source port and the destination port.
IP
Similarly, the TCP packet will then be encapsulated in an IP packet.
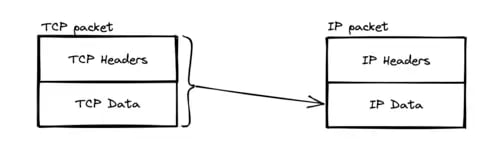
The IP headers, as the name suggests, will contain the destination IP address and the source IP address.
Ethernet
Once again, our IP packet will be encapsulated in another packet, called a "frame" this time: the Ethernet frame.
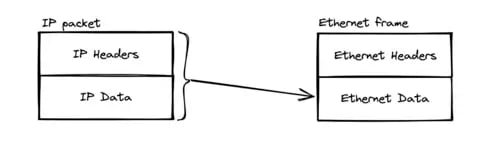
The Ethernet headers will contain the destination MAC address and the source MAC address.
MAC address
A MAC address corresponds to the physical address of a computer. It looks something like this: 6e:9b:e4:3f:0f:fc.
This address is used by the packet to reach the next machine until it reaches the destination server.
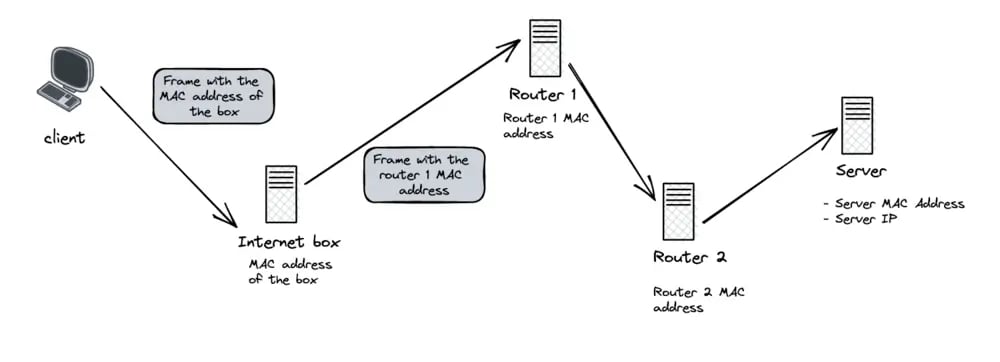
Before reaching its target, our packet will go through various machines. For example, your internet box. Moreover, it is likely that several routers will relay the packet before it reaches the destination server.
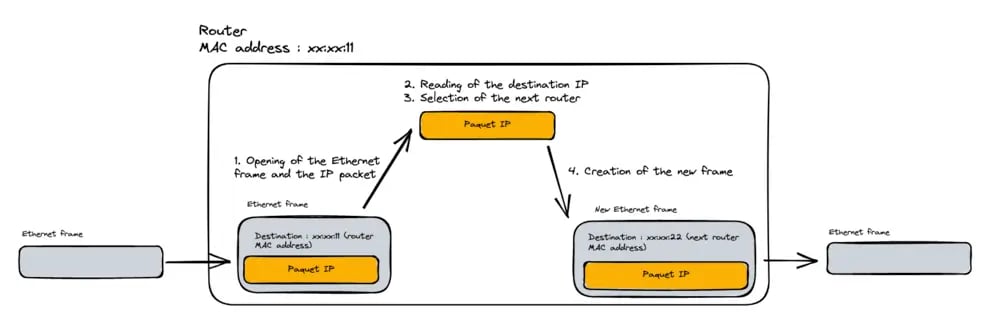
The operation is as follows: the client computer sends the packet with the MAC address of the internet box. The latter opens the packet, but only up to the IP layer. It can therefore read the destination IP address, and thanks to its routing table, choose which will be the next recipient of the packet.
When it has chosen this recipient, it closes the IP packet and wraps it in a new Ethernet frame that contains the address of the next router.
This process is repeated until we reach a router that knows the MAC address of the destination server and can therefore send the packet to it.
And if we zoom on router 1 :
Reception of HTTP request and response
Now that our HTTP request has been encapsulated by TCP, IP, and Ethernet, it has all the information it needs to reach the destination server. It is therefore ready to be sent over the network, apart from what happens at the physical layer, which is not covered in this article.
In the same way that we can use the Python socket library to send an HTTP request, we can use this library to create a small Python web server ready to receive the HTTP request on the other side.
Here's an example:
# server.py
import socket
server_socket = socket.socket(socket.AF_INET, socket.SOCK_STREAM)
server_socket.bind(("0.0.0.0", 80))
server_socket.listen()
while True:
client_socket, client_address = server_socket.accept()
request = client_socket.recv(1024).decode("utf-8")
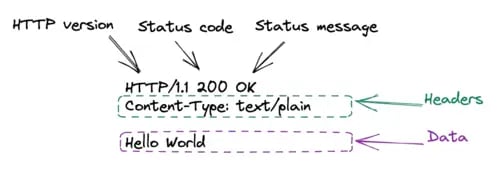
response = "HTTP/1.1 200 OK\r\nContent-Type: text/plain\r\n\r\nHello World"
client_socket.sendall(response.encode("utf-8"))
client_socket.close()First, we open a socket on port 80. Then we make our program listen on the socket.
Now, we wait for an incoming connection. When it arrives, the kernel creates a new socket specifically for the connection with the client. This is the "client_socket" in the code above.
Then the script retrieves what arrives on the client socket with .recv(1024).
The recv function asks for the maximum amount of data it should retrieve, here it will stop at 1024 bytes. It is preferable to set a limit on the amount of data accepted, to avoid blocking the execution of the script for too long. As long as we haven't received everything, the Python interpreter stays at the recv() line, which blocks the opening of other connections and could make our server unavailable.
Once the request has been received, it will be passed to the Python code that will create a response. This is where website developers are used to working.
Here we create a simple "Hello World", in the HTTP format, and send it to the socket.
Here's the format of an HTTP response:
On closing the socket, and with the while True loop, we return to server_socket.accept() which will wait for a new connection.
Sending the response is similar to sending the request seen in the previous chapter.
Receiving the Response
# client.py
import socket

socket = socket.socket(socket.AF_INET, socket.SOCK_STREAM)
socket.connect(("www.google.com", 80))

request = b'GET / HTTP/1.1\r\nHost: www.google.com\r\n\r\n'
socket.sendall(request)

response = b''
while True:
    data = socket.recv(4096)

    data_len = len(data)
    response += data

    if len(data) < 4096:
        break

print(response)
socket.close()
Finally, in a process similar to receiving the request, our client will receive the response.
The while True loop allows retrieval of the entirety of the response. In this case, a request to www.google.com generates more than 4096 bytes.
The HTTP-formatted response is then available and can be used by my script.
I'm not showing you the response to the request to www.google.com, because it contains a lot of code (html, css). However, if in my client.py script, I replace www.google.com with localhost, and I run both scripts on my computer, we can see them communicate with each other!
Here is the response of server.py when called from client.py:
![]()
Conclusion
I hope this article has given you an overview of the mechanisms involved when making an HTTP request.
Of course, all the topics covered can be further explored.
For example, how do we switch from HTTP to HTTPS? This topic would deserve an article of its own, but in the meantime, you can refer to this article on SSL certificates which are an essential building block of the subject.