

Posted on 24 March 2022, updated on 19 December 2023.
Application knowledge
First, you need knowledge about your application. At least one person has to know it very well. If nobody knows the application, you will need a lot of time to answer these questions:
Is it stateless or stateful?
A stateful application means it changes depending on users actions. For example, an app storing files that are created by the user's action in the files System will be stateful.
The impact of the answer is big, the migration of a stateless application is much easier than the migration of a stateful one. In the case of a stateless service, you have to do nothing.
In the other case (stateful application), you need to know which files are stateful and where they are stored on the filesystem. Therefore, someone who has a good knowledge about the application is mandatory.
Then, 2 choices are possible:
- Reworking the code to get a stateless application ;
- Keeping the current state and using infrastructure components to manage the application state.
The first choice is the ideal way without taking the business context into consideration.
Why? Because maintaining a stateful component and migrating it are harder.
Here are the pros of stateless service:
- You will have an application completely adapted to Kubernetes ;
- You will reduce the time to maintain it.
Here are its cons:
- The migration project may be rescheduled (it demands more time for migration preparation) ;
- The shift to a stateless component can be difficult and long.
The second choice is not ideal, but it has some advantages, like:
- You can begin the migration project now ;
- It takes less time than the code reworking.
And it has 2 drawbacks:
- Maintaining the app will be harder (but not impossible, don’t worry!) ;
- You have to implement other infrastructure components to manage the app state.
To manage the state, you will see later what are the different possibilities.
To conclude this question, if you have the time to rework your apps, do it! On a long-term basis, it will be to your advantage. However, if you don’t have time, choose the second option.
What are the dependencies?
Knowing the code architecture and its dependencies lets you anticipate potential problems. Check if all network connections between the app and dependencies are possible.
What are the components to migrate?
The migration will be different depending on the list of components you have to migrate. Do you need to migrate a database (in another location) with the application?
Does your application use session stickiness?
The session stickiness is a process creating an affinity between a user and an application instance. Not implementing sticky sessions in the cluster will cause some trouble for the users because your app will have several replicas. Don’t worry, you can manage them in an infrastructure based on Kubernetes.
How do you configure your application?
It is important to know how you configure your app, does it use environment variables? Or is it in one or several app files?
Using environment variables is better because it is easier to manage in Kubernetes.
How is the application launched?
You need all commands linked to your service like:
- The command which launches your app
- The command to build app packages
- Other commands like the database migrations command.
The collection of information is complete! You can now containerize your app!
Containerization of the application
Now, let’s containerize it! Here are the steps for the containerization:
- Build the image building app packages ;
- Build the final image.
Build the image installing app packages
One of the best practices to containerize an application is to optimize the image size.
You can split your Dockerfile into 2 steps (one to install packages and one to launch the service) to reduce it.
Therefore, let’s begin with the first image installing packages. You can create a Dockerfile on the app repository. Now, follow these steps to build it:
Choose the base image
First, choose the base image you will use to install your packages. This image choice is not very important because it will not be included in the final image. You can select one with the package manager (that you have to use for installing packages) already installed (like npm, yarn, composer, etc…).
FROM node:17.6.0-slim- Install the system dependencies you need ;
- Copy the files you need to install app packages ;
- Execute the command to install packages.
FROM node:17.6.0-slim

WORKDIR /app

COPY package.json ./package.json
COPY package.lock ./package.lock

RUN npm install

RUN npm run build
Build the final image for your app
- Choose the base image
This choice has a big impact on the final image size. The best practice is to use the smallest image possible. It will depend on the app language. If it is Go, you can use the scratch image because it will generate an independent binary. This one has a very small size.
If you can’t use scratch or other very small ones like distroless, use alpine images.
- [If necessary]Install the system dependencies you need ;
- Copy the application files you need ;
- Create a user.
⚠️ The objective is not to use the root user for security purposes.
- Copy the packages needed from the first image which installed the packages
Now, you will use the first image to retrieve the packages. You can just only retrieve the packages from it.
FROM node:17.6.0-alpine3.15

# Install system packages
RUN apk add PACKAGE_1 \
  PACKAGE_2 \
  …

WORKDIR app/

# Create the app user
RUN adduser app

# Create the group and attach the app user to this group
RUN addgroup app app

# Copy all application files needed
COPY –chown=app:app  src/ ./src
COPY –chown=app:app migrations ./migrations
COPY ….

# Retrieve the application packages from
COPY --chown=app:app /app/nodes_module ./build
COPY --chown=app:app /app/build ./build- Use the new user ;
- Execute the command to launch your app.
FROM node:17.6.0-slim

WORKDIR /app

COPY package.json ./package.json
COPY package.lock ./package.lock

RUN npm install

RUN npm run build

FROM node:17.6.0-alpine3.15

# Install system packages
RUN apk add PACKAGE_1 \
  PACKAGE_2 \
  …

WORKDIR app/

# Create the app user
RUN useradd app

# Copy all application files needed
COPY –chown=app:app  src/ ./src
COPY –chown=app:app migrations ./migrations
COPY ….

# Retrieve the application packages from
COPY --chown=app:app /app/nodes_module ./build
COPY --chown=app:app /app/build ./build

USER app

CMD [“npm”, “start”]
Great! You have a Dockerfile! Now, just to be sure that you have a Dockerfile respecting best practices, let’s check some stuff:
First, it is important not to have environment related settings. All environment configurations will be configured in the Kubernetes manifests and not in the Dockerfile. So the app configurations and environment variables can’t be in this file.
Maybe you wonder how you can test your Dockerfile if you can’t define your app configuration. To do so, the idea is to use docker-compose. The benefit is to have a local environment close to your Kubernetes environments.
version: "3.9"

services:
 app:
    build:
      context: .
      dockerfile: ./Dockerfile
    ports:
      - "8080:8080"
    env_file:
      - configuration.env
      - secrets.env
This docker-compose exposes your service on the port 8080 in your machine, then builds and launches the image using files that define environment variables. To execute docker-compose, use the command docker-compose.
Second, it is important to test the Dockerfile without docker-compose because you need to ensure that the image can be launched without it. Otherwise, your image won’t work in the Kubernetes cluster.
So, overall, testing the 2 options (with and without the docker-compose) allows you to be more confident about the necessity of your image.
Now push your image on your image registry.
Prepare your environments and the migration
Before talking about Kubernetes manifests, you need to prepare the environment. So obviously, you need to create the Kubernetes cluster that can be EKS or GKE depending on the cloud provider you chose. Then, if necessary, deploy some other dependencies :
- A database (In the case you have to migrate it too)
- A tool to manage persistent data (Especially for stateful services)
You can use managed services to do it, for example, AWS EFS which works very well. But there are other possibilities depending on your cloud providers. It is not the only option, you can also use the Kubernetes StatefulSet resource that manages stateful components.
- A load balancer in front of your Kubernetes cluster
On this load balancer, you can configure sticky sessions if it is necessary.
Now, it’s time to make the migration strategy!
Every infrastructure can have specific configuration that can complicate the migration, so you might need to check if it’s possible. There are 2 options:
- migrate the database to another location ;
- only migrate the application.
In the first case, you will have downtime on your app because you don’t want to lose data during the migration. This strategy is composed by the following steps:
- Deploy your app in the Kubernetes cluster ;
- Create a Maintenance page ;
- Redirect the traffic to this Maintenance page (with a DNS switch or just change your app by a maintenance page) ;
- Create a database dump ;
- [If your app is stateful]Retrieve the stateful volumes ;
- Restore data in the new database ;
- [If your app is stateful] Restore stateful volumes in the new app ;
- Redirect the traffic to the new application with a DNS records change.
In the second one, you won’t have downtime because you are using the same database. Here is the strategy:
- Deploy the new app in the cluster ;
- Change DNS records to redirect the traffic to the new app.
Create the Kubernetes manifests
To deploy your app, you have to create the Kubernetes manifests. I mainly use Helm to deploy it, but you have other options like Kustomize or just YAML files. I won’t compare all these possibilities because it is not the objective of this article.
The first resource you need is the component that manages the containers. You can use the deployment resource if the service is stateless or a Statefulset resource if it is stateful. You can use a deployment for a stateful application using external services like AWS EFS (for sharing volume between pods), otherwise, use the Statefulset resource. I will focus on the deployment because I have more expertise in this than in the Statefulset resources. And don’t worry, the ecosystem of it is pretty much the same, except for the volume management defined for this resource type.
Here is a standard architecture example for a deployment:
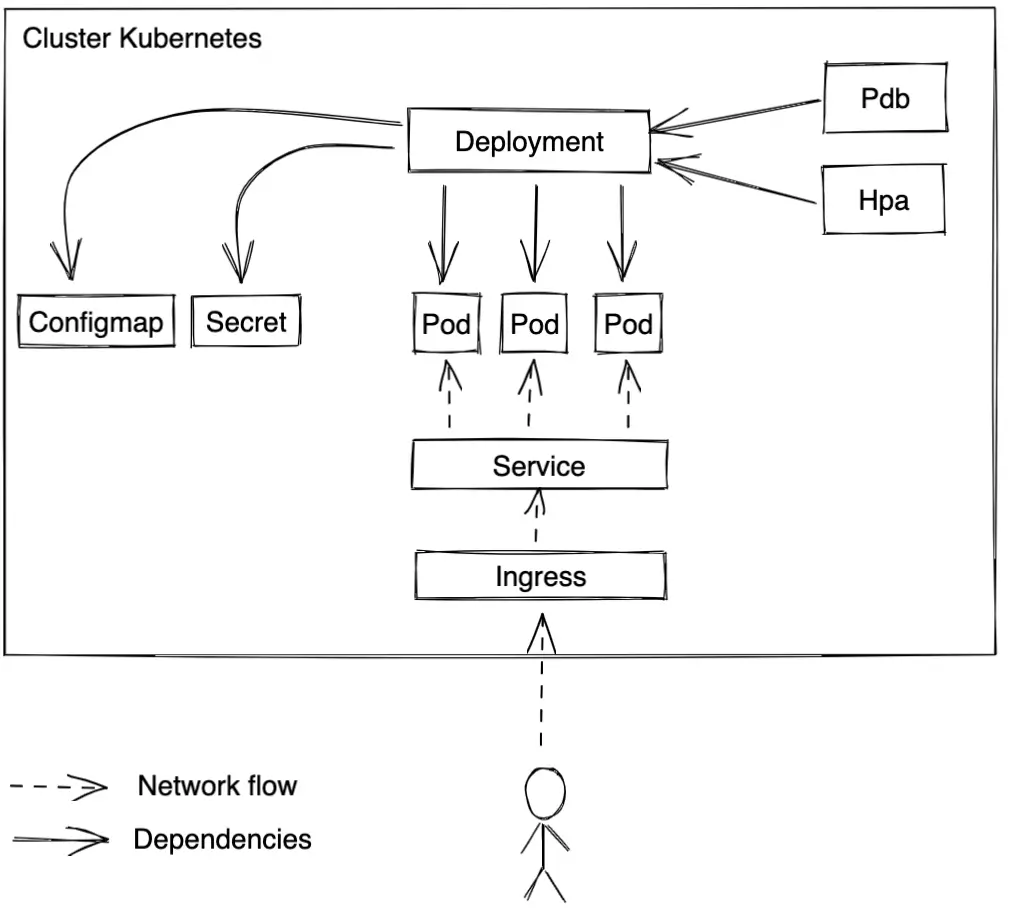
The architecture will be the same for a StatefulSet except for the Deployment resource, obviously.
For every component, I am going to explain it and propose to you some best practices to avoid some classic errors.
- For the deployment or StatefulSet resource:
In these resources, you define the pods configuration, including:
The probes are important for your deployment, there are 3 main ones: Liveness, readiness, and startup probes. The first one checks periodically if the container is alive and restarts it if the container is KO. The second one checks if it is ready to accept the traffic and if not, blocks traffic to this pod. The third one checks if the pod has been launched correctly. So, to use them, define in your app several paths: one for each probe.
- Resources
You can define the memory and CPU used by your app. The resources’ definition is important to avoid the eviction of pods and have more guarantee of pods availability.
- For the configmap and secret
They are necessary to store the application configurations, like environment variables. If this configuration has to be stored in a file in the app container, you can mount the configmap or the secret like a volume in the container. And if it is necessary, you can mount the secret and the configmap merging them in the container
- For the service
The service lets you reach the app containers inside the cluster without using the IP addresses of the pods. It uses labels to redirect traffic to the right ones. You need to add the pods labels in the service parameter spec.selector.
- For the ingress
The ingress manages the traffic from outside the cluster. It redirects the outside traffic to the Kubernetes service.
- For the PodDisruptionBudget (PDB)
The PDB denies you to have more than X pods unavailable or ensures there is at least 1 pod available. It is pretty cool to ensure your containers’ availability..
- For the HorizontalPodAutoscaler (HPA)
The HPA is an autoscaler for the pods. Overall, it scales the number of pods depending on the average of memory and/or CPU usage, but it is possible to use other metrics like users traffic.
- [If it is necessary] For the migrations jobs
If you need to run database migrations, you can use Kubernetes jobs to do it. Overall, I use Helm hooks annotations to make the migration before every code update.
- [If it is necessary] For the cronjobs resources
You can create cronjobs in Kubernetes for your app. The frequency is defined like the linux crons.
The migration
Now, your service works in your Kubernetes cluster! Before migrating it, it is good practice to think about the sizing to fit your production traffic, so you avoid downtime. To do so, you can take 2 approaches:
- Sizing the application as it was on the virtual machines ;
- Sizing it depending on load testing.
Obviously, the second one is ideal because you test the app in the new environment, and you can simulate a bigger traffic than the production. Therefore, you will know exactly, for example, how many users your application can ingest.
To do them, you can use Gatling or K6.
With the other approach, you will have less understanding of your app than after a load testing. The biggest advantage of the approach is the duration of the migration because load testing can take a certain time before the migration.
Therefore, if you don’t have time to load testing, it doesn’t block the migration but be careful with the other approach to ensure your app can manage the production traffic.
Now, you can make your migration! A best practice is to test it in the pre production environment to be sure about the migration operation.
During the migration, you have to check some things:
- Application logs and metrics ;
- Infrastructure metrics (CPU Usage, autoscaling, etc…) ;
- The traffic redirection to the Kubernetes cluster.
Conclusion
Application migration to Kubernetes is not easy, but it is not impossible! The most important thing is to go step by step and understand how the app operation can impact the deployment in the Kubernetes cluster (like the choice between deployment and Statefulset). I hope this article can help you to migrate to that awesome tool which is Kubernetes!